With too much going on at work it’s been months since there had been time to do any work on the foil. Finally found a couple of free evenings and it’s coming together.
The mast had had one layer of carbon so far and the front and rear wings are laminated on one side.
No vacuum bag so not a perfect finish but not too bad just using paintbrushes and rollers. It’s fairly cold in the garage so it took a couple of days for the resin to fully harden.
Hopefully get the remaining pieces finished and everything done before end of January 2018.
After a lot of printer time, the Hydrofoil is finally all printed and glued together. The mast, fuselage and wings are still separated for laminating although the mast and fuselage will be laminated in carbon cloth together for strength. The wings will be bolted on so they can be changed if needed.
3D Printed Hydrofoil/Kitefoil
The total weight of all the printed parts is 952g so just under one reel of PLA filament or around £20 worth. Not bad!
I did a few test prints etc, so the total filament used will be a little more. I’ll get the resin and carbon cloth in a week or so 🙂
I want too make sure the designer of this foil gets due credit as he was kind enough to post his foil on GrabCad here, his name is Prof. Michele Fiorentino. I took his design and then split it into the main part files which I could then cut using Slic3R for my printer. If you would like these individual .STL files I have made them available here. If you print at 100% it should be the right size. I printed 3 or 4 pieces at a time and then glued up using CA glue.
The printing of the electric surfboard hydrofoil is progressing well. I have now printed the front and rear wings, fuselage and the mast is on the printer at the moment.
I wanted to make some changes to the foils design so that the power cables to the motor could be run down through the mast. I have never experimented with any CAD software but thought I would give it a try.
“Hiorth” from the Endless Sphere forum got in touch and suggested that I try an online CAD service called Onshape.
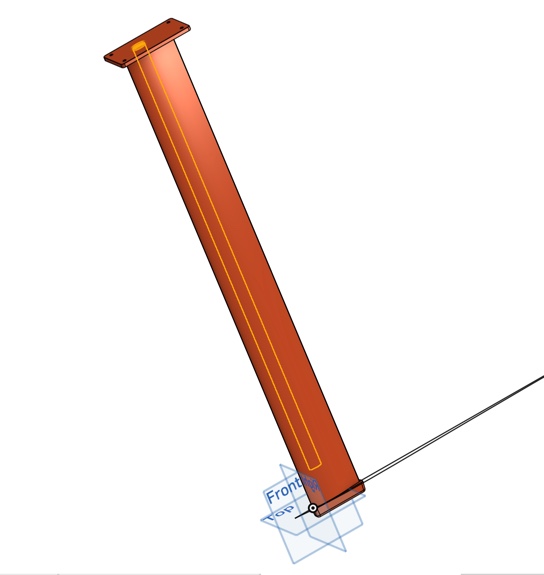
It took a few Youtube tutorials but I managed to add a nice oval hole down the centre of the mast. I didn’t go all the way down as we will be coming in either out the back or the side of the mast above the rear wing with the motor mount. I’ll just use a soldering iron to make the final hole through to the main wiring channel. You can see the outline of the hole in yellow on the image below.
Kitefoil Mast 3D Rendering
I printed a test piece to make sure it worked ok. The part is still very strong.
Kitefoil Mast Test Piece
The mast was then cut into 6 parts for printing. First three are still going on the printer. 1.75mm white PLA with 20% cubic infill. The cubic infill is both very strong but its also a little like closed cell foam so if the hydrofoil does get damaged, water should not be able to ingress far.
Kitefoil Mast Printing
I’ll start assembling all the parts soon and get ready to laminate them in carbon.
After setting everything up per the instructions there was no excuse but to get the plane in the air (or at least attempt to).
You can view the maiden flight here,
If you watch to the end you will see the rather heavy crash. It looked pretty mangled but amazingly it was just a few printed parts that needed to be replaced. The prop, motor, ESC, servo’s etc, were all fine.
I printed the replacement parts over night. I had run out of grey filament so the replacement parts are all in white.
3DLabPrint Spitfire repaired after the crash
Next time round I will be trimming it carefully. I’m pretty new to RC planes though, this thing felt 10 times quicker than the foam AXN Floater Jet I started with.
Amazing that something like this can be printed at home. Kudos to the team at 3DLabPrint for their amazing designs.
A friend and I had been looking for a project and after deciding an electric motorbike was just going to be too expensive to build he came up with the genius idea of an electric surfboard. There are a lot of these coming onto the market now and they seem to be either water jet pump powered or more interestingly hydrofoil boards like the eFoil
eFoil
We started researching the water jet pump versions first. The pumps themselves seem to be similar to commercial ones you can buy from the likes of MHZ Watercraft
MHZ Watercraft Jet
But at over 500 Euro for one (we might need two) it was going to get very expensive. Add on top the motors, speed controllers, batteries etc and the electric motorbike may have been a cheaper project! Boards retail at over $10,000. They do look nice though, Onean have one coming out.
The challenge is that you need a lot of power and so the ride times can be as low as 20 minutes.
It could still be a lot of fun so I hunted around for a 3D printable jet pump of sufficient size that we could use. Looking around I came across this design by Toto44 on Cult3D for $12.
3D Printed Water Jet Pump
It took quite a while to get the settings and supports right to print the pieces (trying to minimise the use of supports) but I now have all the main pieces printed. It has a 65mm impeller so quite large and comparable to the MHZ Jet Pumps. It weighs next to nothing. No idea if it would be strong enough yet, I have ordered the shaft and need to get the bearings and shaft seal ordered before I can test. The parts came out really well though using PLA.
3D Water Jet Pump
I’ll write up another post when I get the rest of the parts and can test it.
In the meantime looking at the Hydrofoil boards, there was a great thread on the Endless Sphere forums here.
Pacificmeister came up with a working board although it did require a gearbox. He used a commercial foil and a lot of 3D printed parts although he hasn’t yet shared those plans. Looks great though,
Not wanting to spend a fortune on a foil though I want to see if there were plans that could be adapted for 3D printing with a view to then laminating in carbon fibre cloth over the print. Much easier that designing the moulds.
Luckily there were such plans available here on Grabcad. Looks very good and better still he has made one that works.
Kiteboard Hydrofoil
So I downloaded the CAD files and exported to an STL file in OpenSCAD. Once I had that I could split and then cut the parts in Slic3R.
That gave me parts of a workable size to start printing.
Foil Rear Wing
I have the front and rear wings now printed and the fuselage is printing at the moment. All in white PLA with 15-20% infill. I’ll work out how much filament it will have taken at the end but it will likely be around £20 worth of filament.
Foil wings
Next stage will be to join the parts with CA (superglue) and think about laminating them in carbon.
The motor and propeller is still being researched so lots more to follow.
I have a couple of foam RC planes but the Prusa i3 MK2S came with a set of files from 3DLabPrint for an RC Spitfire.
This seemed like a good test for the printer so I started to print a few of the files. They came pre-configured for the printer so it was just a matter of adding them to the SD card.
I was using the reel of silver PLA that came with the printer.
Control Surfaces
The files come with multiple parts on the same print, already laid out.
Finished Control Surfaces
The quality of the prints was amazing and the designs by 3DLabPrint have an incredible amount of detail.
Nose ConeNose Cone Structure
The nose cone for example has a very complex airframe structure.
Wings
The wings have ribs like a traditional airframe and a very thin skin. There is even a tube running down the centre for the servo leads.
All Spitfire Parts
All the parts were finally printed and ready to assemble. You just join together with CA glue (Superglue). The videos 3DLabPrint publish on Youtube take you through the whole construction process.
And finally the plane is done, electronics fitted and ready to fly. It has just under a metre wingspan. The tolerances on the parts are very tight. I had some slight lifting of parts on the bed, mainly the larger wing actions but by adjusting the settings I was able to avoid this although I had to re-print the two larger wing sections.
Finished Spitfire
I added a couple of 3rd party printed parts from users on Thingiverse,